The Great-Wall Transformation

The Great-Wall Transformation

If you're like me, you know what you want but can't exactly explain it to anyone else. If you're like me then you might also scour Pinterest hoping someone smarter and a few steps a head of you already did what you have in your head. Here are some of the things I loved.


fireplace-built-in-shelving-6-via-the-sweetest-digs

plank-wall-6

fireplace-built-in-shelving-2-via-the-sweetest-digs

Great-tips-on-making-the-most-of-the-little-space-you-have

DIY-mudroom-bench-640x1024

DIY Board & Batten Entryway Redo-3blog

Soooooo, yeah. Didn't find anyone who combined what I was going for. I mean sure, slapping a mudroom-like wall on a giant wall in your living room right next to the front door with an entertainment center in the middle of it doesn't appeal to everyone...or maybe anyone. But, my hubs and I decided a long time ago that we would LIVE in our home. We want it to be comfortable, functional, fun, and inviting.

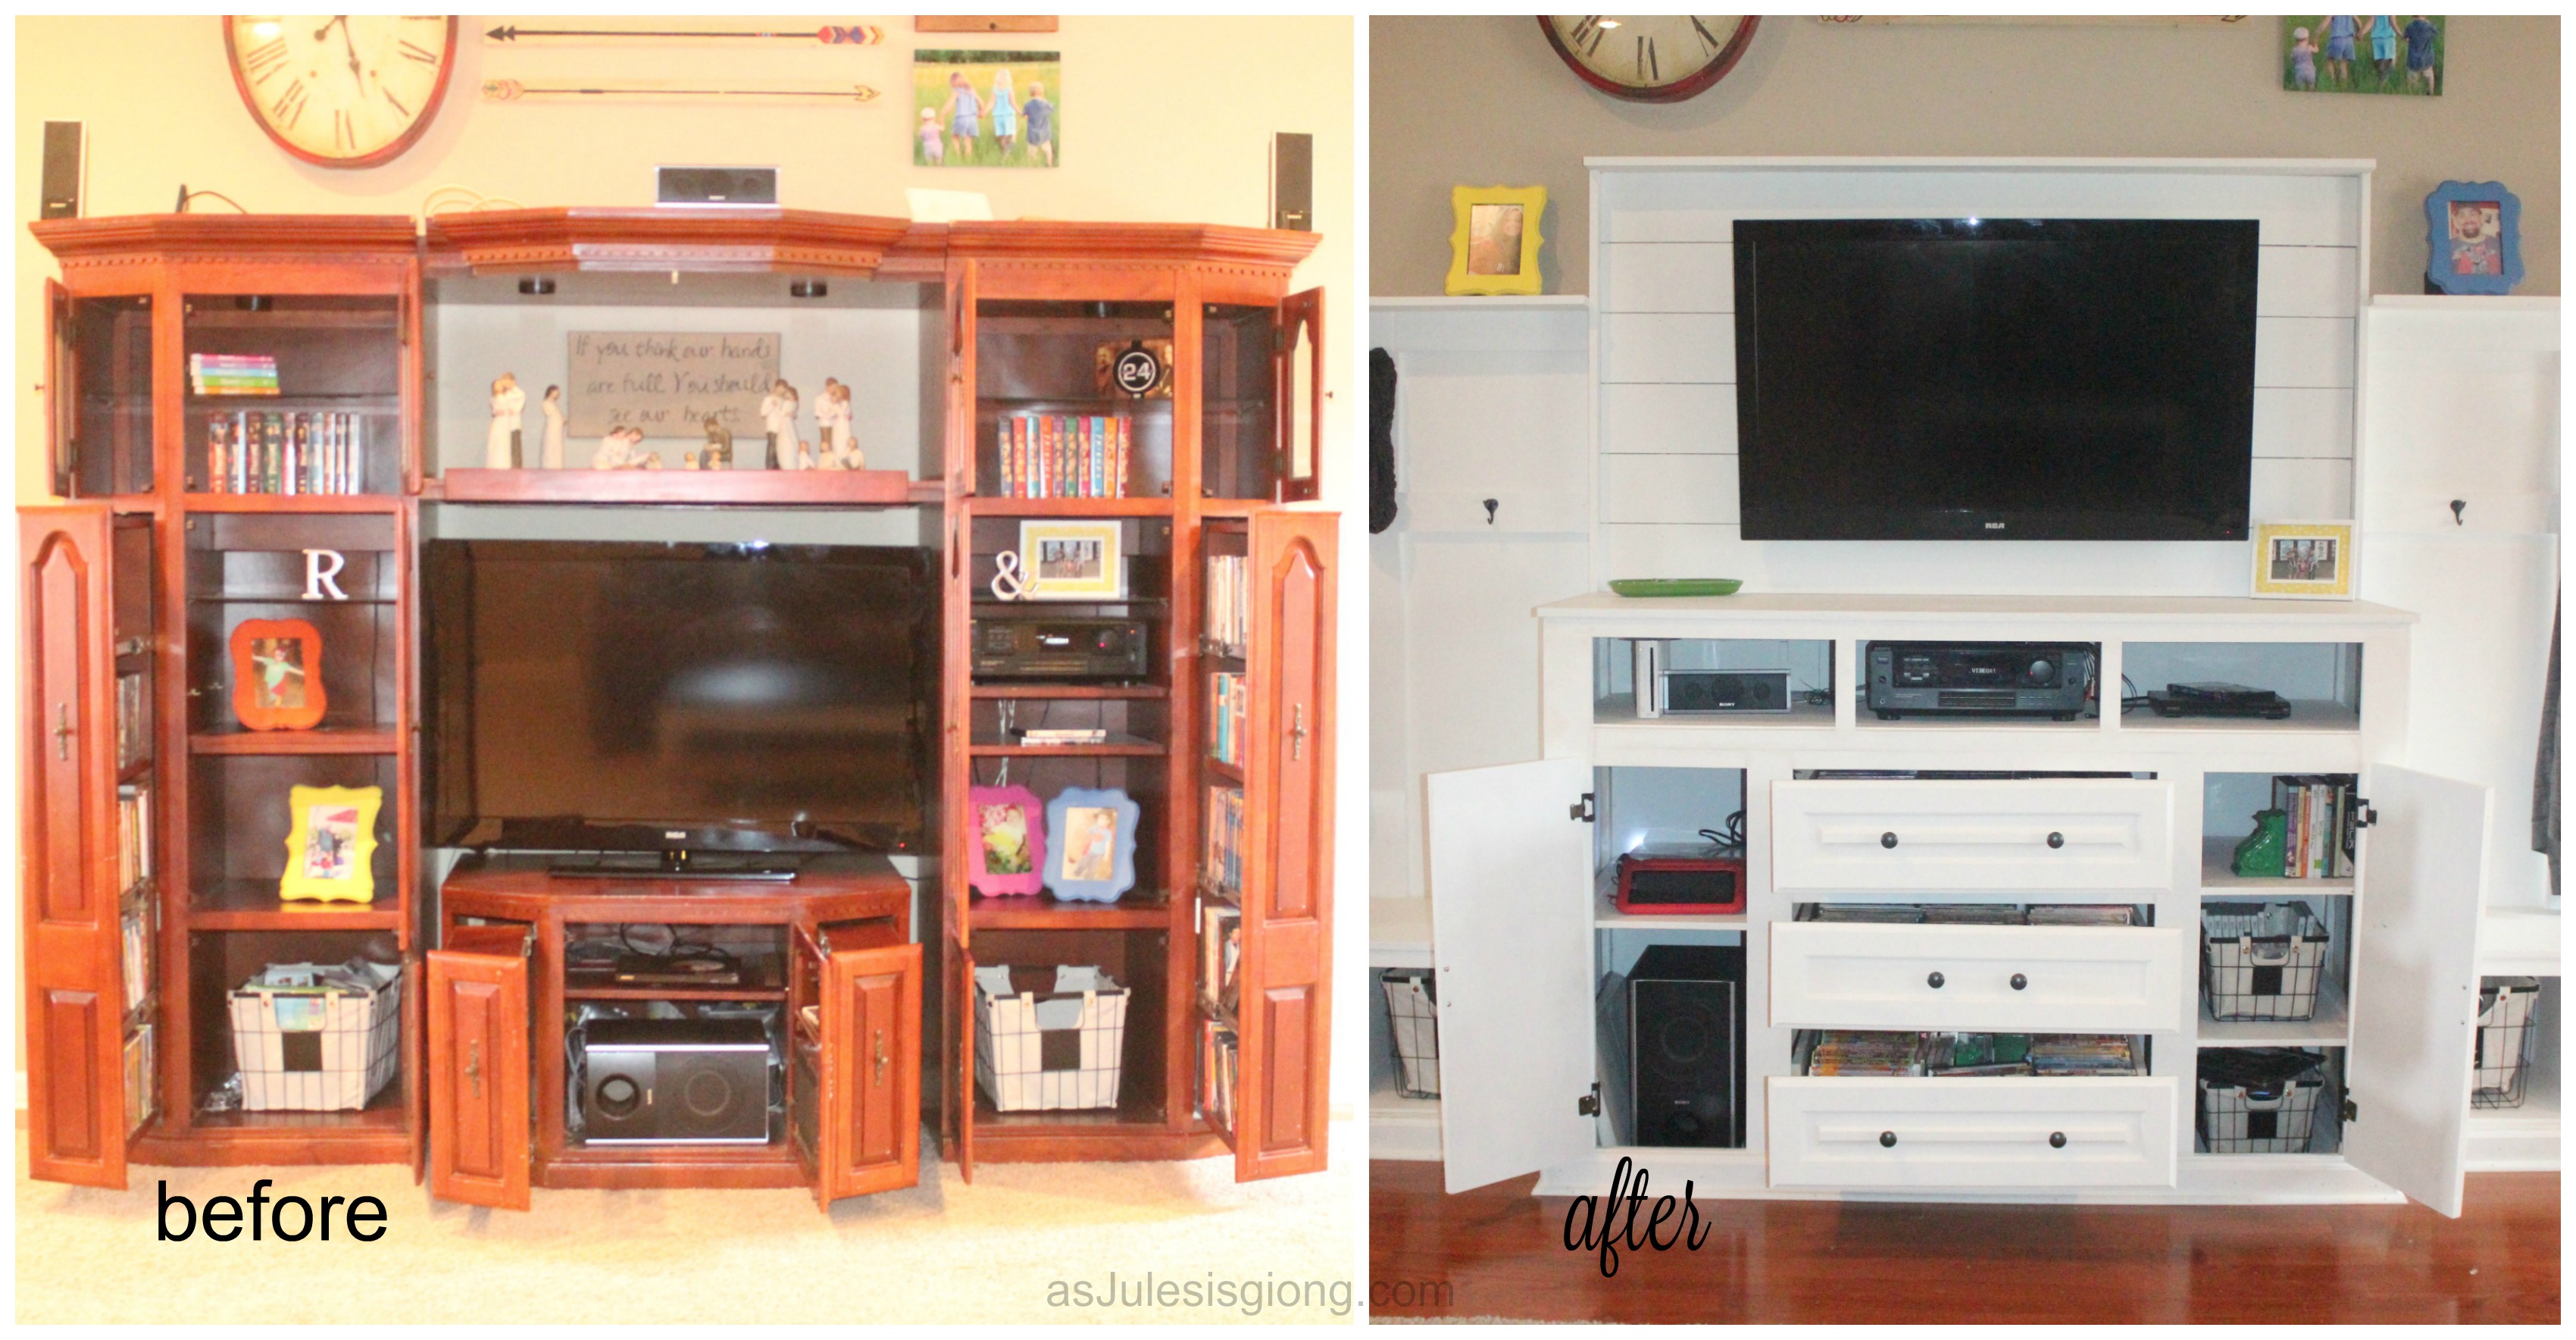
After looking at tons of pins, thinking through the thousands of things I wanted this is the list of thing I needed from this wall and the simple sketch of what I came up with for my hubs to work with.

the original sketch for the Great-Wall transformation

Mudroom

  • Lots of hooks for winter gear
  • Space for each individual's shoes
  • Washable baskets to collect shoe grime
  • Kid-friendly usability
  • Classy enough look for adults
  • Ledge for my picture frame obsession
  • Bench for more seating
  • Ability to walk from front to back door with shoes on
  • Decorative board and batten
  • Bright White wall to lighten up the entire room

Entertainment Center

  • Wall-mounted TV
  • Lots of DVD and some video game storage
  • Easily reachable DVD player, sound system, and Wii
  • Storage for all small electronics from around the house
  • Charging station for camera and iPad
  • Decorative "ship lap" to hide wiring

Process of Building the Wall

  1. Move all furniture
  2. Clean wall and flooring
  3. Build structure of the entertainment center
  4. Install chair rail and ledge pieces {horizontal boards} 
  5. Hang TV mount
  6. Remove baseboards
  7. Pull up carpet
  8. Tear up tack-strip
  9. Cut off excess carpet and padding
  10. Cut tack-strip to appropriate length
  11. Reinstall tack-strip
  12. Staple padding in place
  13. Tuck carpet around tack-strip
  14. Complete entertainment center
  15. Attach drawer faces and tracks on drawers boxes
  16. Push entertainment center in place {don't install}
  17. Measure 8000 times
  18. Build benches
  19. Moved outlets up {above bench tops}
  20. Patch drywall/add wall texture
  21. Attach wire spacers on the wall
  22. Attach ship lap to spacers
  23. Spray paint primer coat on 3 loose pieces
  24. Install entertainment center and benches
  25. Install trim pieces {vertical boards} on wall
  26. Install baseboards and quarter round
  27. Fill all cracks with caulking
  28. Paint...everything
  29. Sand rough wood
  30. Install hooks and hardware


hanging chair rail and ledgeremoving carpet hole on the back part of the entertainment center where the cords feed in from behind the ship lap

Entertainment Center before and after mudroom-like before and after

I could write a gazillion posts on my thought process behind each logistical reason I wanted things a certain way but not too many on the construction steps- maybe I'll tak my sweet hubs into writing more on that. Sorry I don't have more process pictures. Thanks for coming by to see our new Great-Wall! Weeks later and it's still making me smile.

Share Button

Post to Twitter

Outdoor Toy Storage {Thoughtful Thursday}

We've tried lots of different things to hold the kids toys. Laundry baskets. Shelf made from old drawers. And the most recent attempt, an old bakers rack that was left in our shed by the former owner we were using for tools.

Baker's Rack to Outdoor Toy Storage BEFORE and AFTER

After wiping it down I used my favorite kind of paint for furniture {or just about anything}: Spray Paint. After getting the entire thing coated with the blue, I used some cardboard and tape to block off the wooden top and sprayed it with black chalkboard paint then added simple white knobs I had in my pile of "leftover" parts from projects.

I pulled it up on the deck and added toys. We'll see how long this lasts and if it makes the kids wanna put their things away any more than the other tries.

Share Button

Post to Twitter

Surviving a Sudden Side Job

I'm excited to announce that the Homemaker's Challenge is switching things up from now on! Rather than themes for each month, we are moving to a "collum" based contributor site where each writer will share out their wheel-base. I bet none of you will ever guess what my collunm will be about! {sarcasm} Life with Lots of Littles! So, for all my mamma friends with a load of lots of littles, the 3rd Tuesday of every month, I'm hear to talk straight to YOU! This months:

Surviving a Sudden Side Job with Lots of Littles

When you are raising lots of littles, finding "spare time" to have an extra side job to meet financial goals can be tough. Today I am sharing from my failed attempt at this. Here are my 7 tips for Surviving a Sudden Side Job with Lots of Littles.

Share Button

Post to Twitter

Easter Neighbor Gifts {Thoughtful Thursday}

Thoughtful Thursdays on as Jules is going

If you've been here any time at all, you know we LOVE a good excuse to do something fun for our neighbors.

Bucket-O-Summer

This week, my kids were wanting to make "Easter baskets". I'd already been considering making something to celebrate summer for the neighbor kids around us who are almost out for break. With summer for school-aged kids still over a month away, we thought we'd try to do both mixed together.

Bucket-O-Summer contents bucket, shovel, bubbles, sunglasses, jumprope, germX, chalk

Buckets-O-Summer

Contents we used:

from the Dollar Tree

  • bucket and shovel
  • germX {pack of 3 Christmas themed- I pulled off the winter-esk sticker}
  • jump rope
  • sunglasses

from home {originally mostly from Wal-Mart}

  • sidewalk chalk in a large box
  • little bubbles that came in a pack of 8
  • assorted Easter grass
  • See Jane Work labels {on wicked sale at Office Depot}
  • blank note cards
  • post card invites to your Church's Easter service
  • pipe cleaners and rubber bands {we used the rubber bands to told the 7 pieces of chalk together in the shape of a flower and then made lil leaves around it}

How-to Make:

  1. collect bucket and gift items
  2. add grass to the bottom making it about 1/2 full
  3. place larger items in 1st
  4. mix in smaller items {dividing like colors from one another}
  5. *we color coordinated each bucket using ~2 colors for fun
    green and pink and purple and yellow for the neighbor girls and orange/red and blue for the boy
  6. create label {print our FREE LABEL here} using Avery Label Template 5450 in Word
    Bucket-O-Summer Label
  7. color in lettering for extra fun {sharpies worked the best without smearing the print}
  8. cover original cheap sticker on the bucket that wouldn't com off with new label
  9. write a cute little note about Easter linking items in the bucket {or print our cheesy FREE NOTE here}
    Easter Bucket-o-Summer
    I wrote out the note in yellow marker in a card and let my almost 6-year-old trace it {so it would all fit in the little cards we had}
  10. throw in a postcard invite to your church's Easter service hand-deliver with smiles 😀

Delivering Neighbor Gifts

Happy Easter!!!

Share Button

Post to Twitter

Easter Crafts with Littles {Thoughtful Thursdays}

Thoughtful Thursdays on as Jules is going

portrait of a happy young studentThis week I want to feature a guest post from Olivia Glendale, a a 20-something year old mother of two, both under 2 years. When she’s not busy soothing tantrums and changing diapers, you can find her blogging about home décor, organizing, and DIY projects at www.DIYMother.org. Today, she has super cute ideas for Easter crafts you can easily do with your littles!

My family has a tendency to get caught up in spring fever. My husband is a DIY addict like me, so springtime means outdoor projects every weekend: staining the deck! Cleaning the gutters! Yay!

I, on the other hand, prefer to garden and host gatherings with the extended family. And Easter is one of my favorite holidays to fill with family and fellowship. Because, really, what better way is there to celebrate a season of new life and growth than with the resurrection of our Lord?

This year will be the first year I can involve my 18-month old in Easter crafts. Naturally, I’ve been looking around for fun crafts to do with her, as well as all of her cousins on Easter Sunday. Here are a few of my favorite Easter crafts I’ve found. The links to the tutorials are listed below each photo.

Egg Carton Cross

Egg-Carton-Cross-10
From Housing A Forest

This is a great craft for the kids after church on Easter Sunday-especially if you have some cooking to do. It’s pretty simple: cut out 5 cups in a row and then 3 cups in a row from an empty egg carton, preferably the cardboard kind.

Glue the inside of the middle cup in the row of three and glue the cross together. Let the kids paint it, add glitter, beads, or cover them with fabric.

Rice Krispie Eggs

Easter-Egg-Rice-Krispie-Treats
From HTYM.com

I absolutely love this idea and cannot believe I’ve never done it. Prepare the Rice Krispie treats as your normally would; no need to go through the steps, we’re all parents here…we should be pro’s by now. Then wash and dry some plastic eggs and spray the insides with non-stick spray.

Push the Rice Krispies into each half of the plastic egg, working it up the sides. You want to create a cavity, so leave enough room to fit candy inside. Let the Rice Krispie mix set and gently slide them out of the plastic egg. Put a few pieces of candy inside (jelly beans, robin’s eggs, whatever you prefer) and press the egg halves together using a little bit of pressure. You can even decorate the Rice Krispie eggs with sprinkles or icing.

Share Button
Related Posts Plugin for WordPress, Blogger...

Post to Twitter