Rothacher Academy 2017/18: curriculum and organizing the entire Year

Yesterday I *started* the next steps in the process of planning, sorting, and organizing our entire school year.


One of the first and scariest questions people ask when they find out we homeschool is, "what curriculum do you use?" Sigh.
For some this might be an easy question but for me, it's untangled with guilt, defensiveness, weight, and a long pause.

We use ... whatever. Due to finances, too many options, different learning systems, and my tendency to over analyze things-

  • We use things people have given us and Recommended.
  • We use cheap, all-inclusive but sparse workbooks, usually from SAMs Club- great for getting an idea of what basics are expected at each grade level yet sometimes a little low on leveling.
  • We use free printable materials found online.
  • We use books, field trips, and life.
  • We use/create/do lots of unit studies.

I've pictured what I currently have for each child as well as what we [three oldest] will be doing together.

We just had our Vilonia Homeschool Coop planning meeting for the year. We brought all our ideas for field trips, educational tours, holiday parties, and seasonal meet-ups. The first thing I did in planning our Rothacher Academy school year was mark down in my planner when those coop meetings were likely happening.

Then I started on the first week in September and numbered out our weeks of school, skipping the weeks for holidays or busy weeks we'll need a break. That way I knew which folder to plan holiday until studies. I also add each child's activities {and times}. Everyone in the house has an assigned color so I just use that color pen to save space by eliminating the names. VHC field trips are penciled in until confirmed times/dates. 

These are the workbooks I will tear the pages out of and divide up among the weeks. I make sure to include each subject each week but not necessarily for each page. We tend to do school work 3-4 days a week.

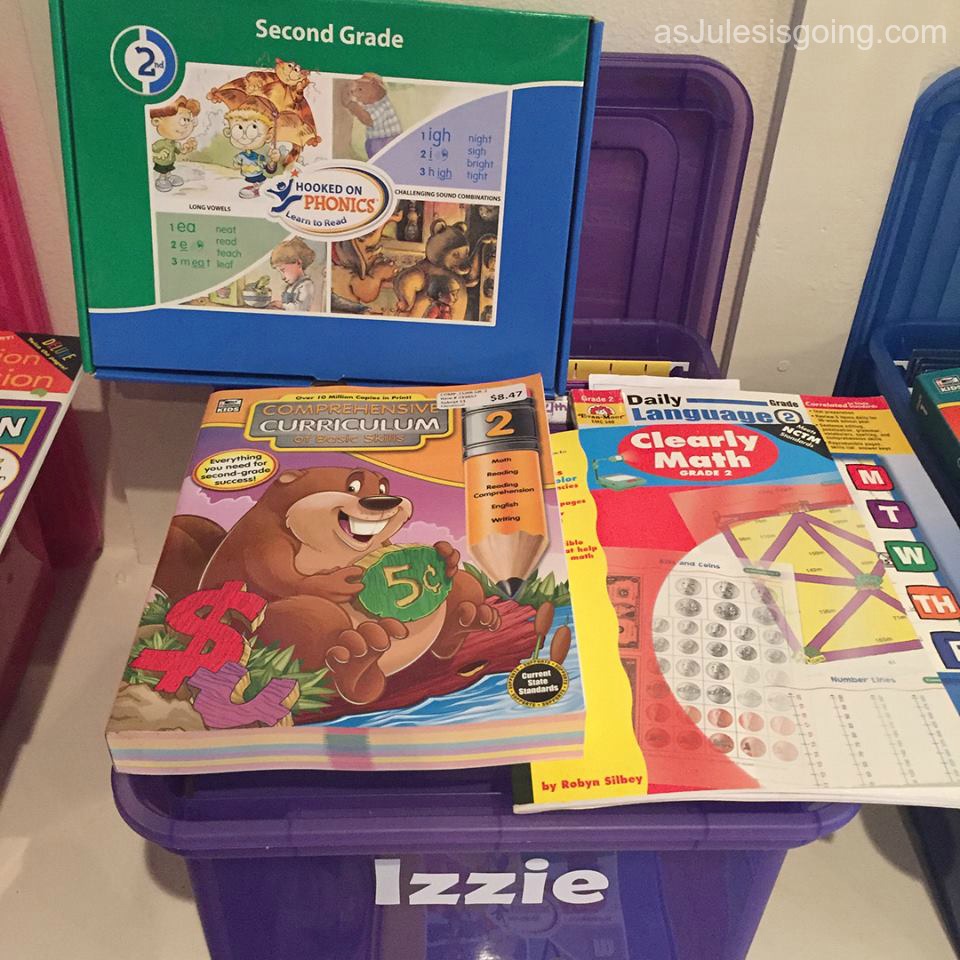
The Daily Language workbooks were found at Mardel's in the clearance section. The Comprehensive Curriculum workbooks was found at SAMs Club. Hooked on Phonics set was found on an online yard sale via Facebook.
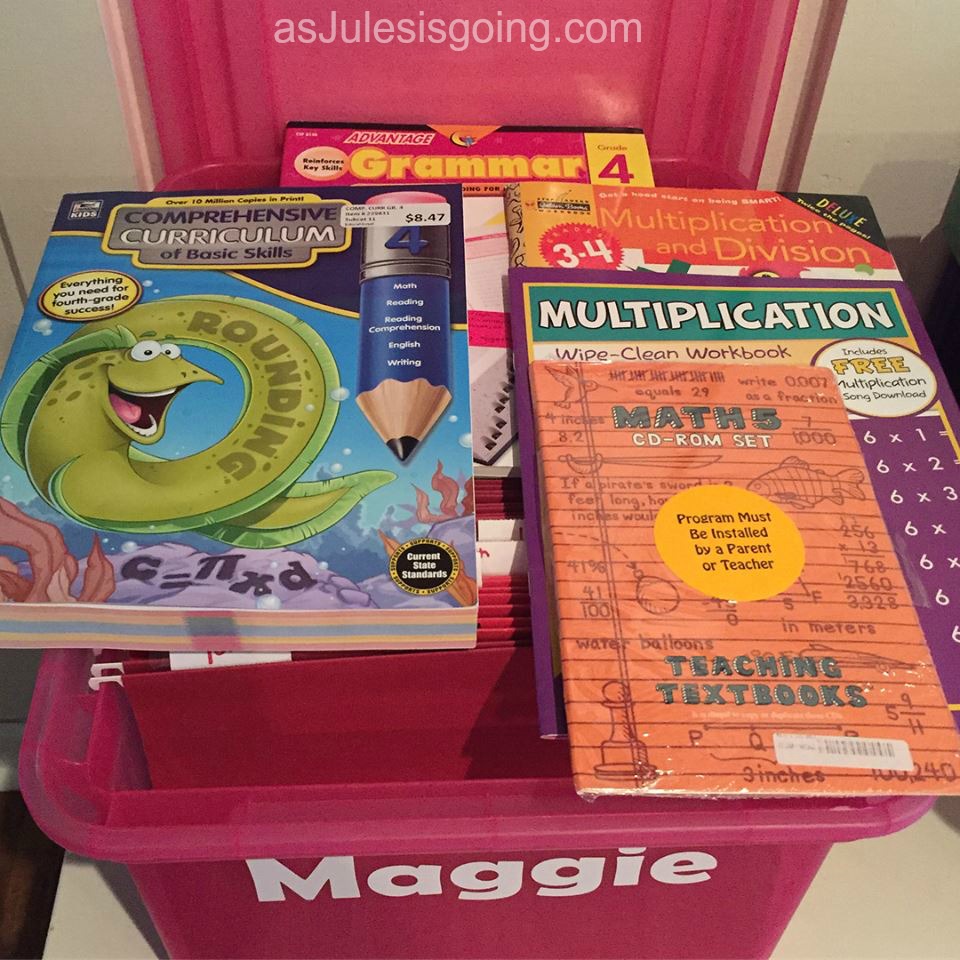
The Multiplication Wipe-Clean Workbook was found on Rainbow Resource Center in the clearance section. Teaching Textbooks Math 5 {cd rom set only} was found NEW on Ebay.

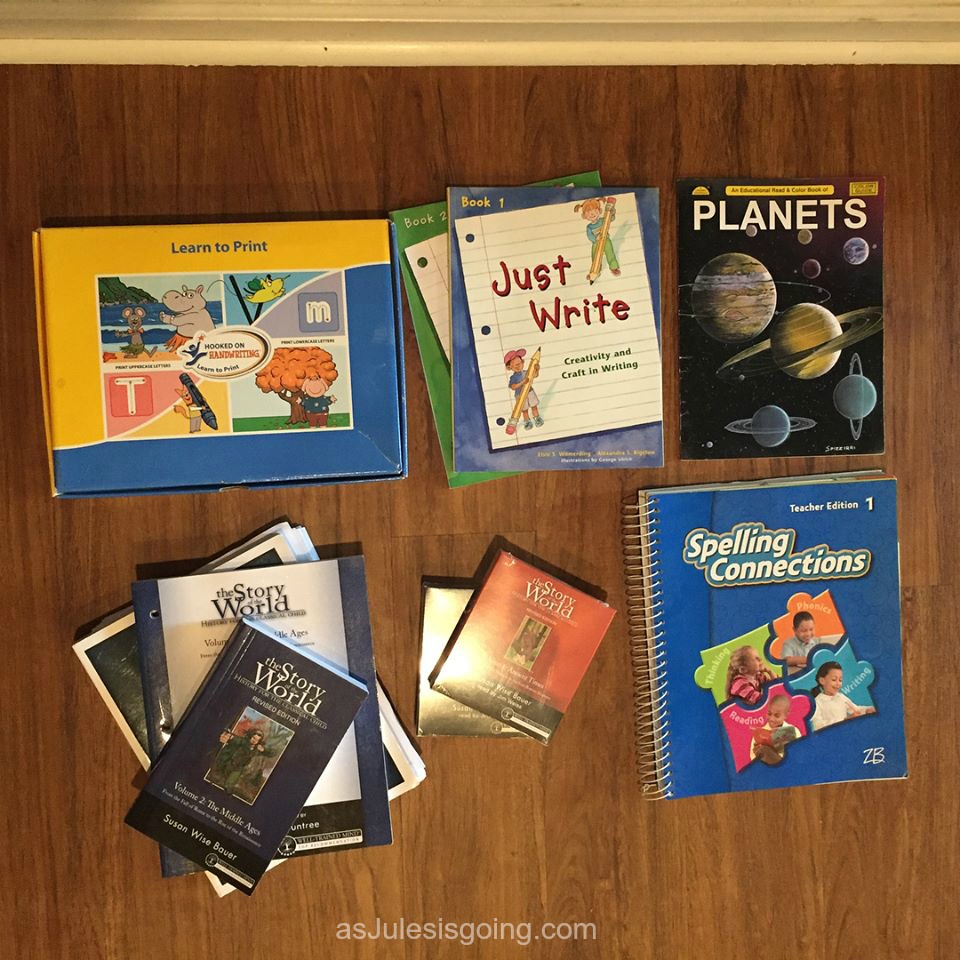
Story of the World was found at a used homeschool book sale in South Carolina by my SIL. The audio cds {we have the entire set of 4} were found cheapest on Rainbow Resource Center along with the planets coloring workbook via their clearance section. Spelling Connections has an entire kit and came from a friend who did K12 online public school but no longer needed this.  Just Write was either given to us or I found it on sale on Amazon.

Along with these, I also find lots of fun, often FREE printable materials online via blogs I've found on Facebook or Pinterest. I also utilize Teachers Pay Teachers, Typing.com, and only use educational FREE apps for the kids 20 minutes of iPad time each day.

I use these folders to always have something ready for the week. Ideally, I will lesson plan weekly, adding to each thing or preparing lessons but in case...life, I have a basic plan ready for each week. I pull it out and place it into their baskets where their history binders and other books are stored. They grab them each morning after morning chores, daily chores, breakfast, table chores, and activity classes at the public schools and get to work. Most days, we finish before lunch after a couple of hours of working.

How do you try to organize your homeschool to keep everything/one moving? Are you like me, modge podge curriculum or do you do a specific all-inclusive one?

Share Button

Post to Twitter

Using a Responsibility Chart for Multiple Children

I found this awesome Responsibility chart made by Melissa and Doug at a consignment event. It comes with all kinds of magnets to create a very unique chart.

How to Use a Responsibility Chart with Multiple Children

I think most families use it as a kind of "sticker chart" by rewarding kids with smilies when they do something. BUT you know I can use very few things for just their intended purpose. I use the magnets to assign jobs for the week. The kids rotate jobs each week so they learn to do all the household chores. I've also started assigning table chores to be done after eat meal. I paired the most difficult household chore with the simplest table chore.

I use the bottom dry erase part to group things they're all supposed to do daily- the ones they don't earn commission for doing.

Over the years, the commission pricing has changed a lot. I'm still a cheap mamma living on a tight budget but I understand the benefits of paying my children to do some chores so they are learning to manage money...even if its not a lot. These days, I pay based on the difficulty of the chore. I also use commission that can be visually seen in a single coin. They're learning the value of coins, and mamma can easily count it out on pay day. 😉

  • Laundry/clear the table earns $0.25
    I load/start laundry every night and the children move the clean load into the drier the next morning and then sort it into each bedrooms' basket when its dry
  • Dishes/wash the table earns $0.10
    I load/start the dishwasher [usually just] every night and the children unload/put away all the clean dishes the next morning; most dishes are down low for this reason
  • Trash/Dog/Sweep earns $0.05
    Our dog sleeps in a kennel every night and the children let the dog out in the morning and feed the dog once in the morning and once at night
    They empty the small bathroom trashcans every morning, occasionally help their daddy take out the big kitchen can, and the night before trash day they help take the outside cans to the street and bring them in after it's been picked up

Each child in our house is color coded meaning, they know based on the color on the chart which chore they're on that week. Color coding may seem odd, but with lots of littles its super helpful in lots of areas. {ie Cups: they get a single cup per day and we can always tell who lost theirs}

Responsibility Chart {with cousins}

This chart is how I broke it down when my niece and nephew came for a week. THEY ask to be put on the chore chart for the record. And yes, it's in age order. We start "training" our children on chores around 2 or 3 years old and by 4, they "get to be on the chore chart".

This chart is very helpful for our family. Do you use anything similar? How does it work for your family?

Share Button

Post to Twitter

Back-to-School Supply Shopping Tips {Thoughtful Thursday}

I am often annoyed that Hobby Lobby has fall decor out before 4th of July or that Christmas decor is everywhere in stores before Halloween BUT I might be in the minority when I get gitty when school supplies show up in stores. Eeeek The smell of sharpened pencils, clean new binders, shelves upon shelves of crayola colorfulness!

image

I have been preparing my school supply list for the 2-16/17 school year already. Part of my prep included scouring the internet for the best prices on the items on my list. Here's a quick overview of what I've found that might save you some time and money::

  1. Staples price matches 110% of any {even online} sale price. This is #1 because I feel like it could cut down on shopping time by going to a single store. They will not only match a price but give you 10% off on top of that. example: Staples glue $2, Walmart glue $1, Staples glue now $0.90
  2. 7 ways to save with Staples, stack them all!
  3. Walmart's app has a "Savings Catcher".  This means you scan receipt on the app and if competitor advertises lower price, they'll give you the difference.
  4. Target cartwheel app has tons of great coupon deals AND Target Red Car saves you 5% every time you use it and it connects to your checking account, acting just like a debit card. No more forgetting to pay that store credit card you have just for the discounts.
  5. Walmart vs Target cheat sheet to get the best prices {if you don't have a staples to match their prices 110%}.
  6. Tax Free Weekend! Arkansas' will be Aug 6th through Aug 7th. HERE is the list of qualifying items for Arkansas.
  7. Homeschoolers can register your "school" with Office Depot for their 5% cash back. You can have anyone you know use your school name to put their 5% cash back towards. If you don't have a school you use yet, ROTHACHER ACADEMY of Vilonia Arkansas would love your support. 😉
  8. Homeschool moms can register with Staples for teacher discounts.
  9. Christian Books website has a $1 sale right going on right now through Aug 18th. It includes some books that would be great for homeschool.
  10. Deals from several store that you need to grab up This Week!
Share Button

Post to Twitter

DIY Built-In Bookshelf and Desk {Thoughtful Thursday}

Originally, I just wanted something in this awkward corner of my living room. It's the only thing in the room that causes it not to be completely square. This little joint out is created by the master closet and it's kinds fun, adding a little character to the room. Every week when our small group would come to our house, it bothered several friends. "What are you gonna put on that wall?" Ya know, since the rest of the room was covered in pictures and such.

Thoughtful Thursday

Here was my attempt to decorate this space. A cute dresser friends gave me and I painted, my awesome clock I'd been ogling and my hubs got me fr Christmas, and some other random decor items I had around the house. It worked for a while but seemed so minimalism compared to the height of the room and the scale of everything else in the room.  

I always loved the built-in shelves I've seen on Pinterest. But this wall is 12' tall and about 5' wide. I wasn't sure my hubs would be up for such a *big* change. I proposed the idea and when he didn't totally hate the idea, I sketched out what I was thinking and showed him several image ideas on Pinterest. 

At the end of the summer last year, I suggested maybe it could be my birthday present. He agreed 😀

A friend of ours visited from out of town and agreed to help Matt build my monstrosity over the weekend he was staying with us. Eek

There were a couple things that came up throwing a wrench in my plans but we worked around them. The main one was the carpet. We have hardwoods in our living room but the former owner chose to put carpet down with with a tack strip and a one foot of hardwoods showing around the entire room. We had never taken up carpet and discovered the take strip was installed with huge nails leaving big holes in the floor. We weren't ready to deal with holes in the floor every few inches so we chose to build the shelve up to the height of the baseboard. We added [mostly decorative] feet to the front of the shelf that we had intended to use on the bottom of the girls' dresser

In my mind I worked from the top shelves down. I knew I wanted bookshelves up top. Then I wanted a desk-like space for our printer and working on homeschool or other stuff. Below that, I wanted plenty of space to store paper, our laminater, and larger items like completed scrapbooks. Just recently, I caved and bought a cardboard paper divider to keep them sorted and from getting all torn up in a basket. Ideally, I wanted a wooden divider but I was never going to pay for one. After lots of finagling, the cardboard one fit perfect and does a perfect job. 

Yes, I chose to sort our books by color. Most of these books are on the same or very similar topics and have already been read or are only used for reference. Plus, I like color and makes the shelves more decorative since I ended up with more books to fill it than first expected and less room for other cutesy things. 

built in book shelf desk paper divider

A year later, having never posted the original post, I'm still loving this built-in. It adds a decorative aspect to this otherwise odd corner of the living room, stores all our book that would be in the attic if not here, makes them easy to read and or lend, makes printing, laminating, and working on things in general so much more practical.

Recently, I gave up on finding an affordable wooden paper divider the size I wanted and went ahead and bought a cardboard one from Target. With 15 slots, it has enough space for the kids construction paper as well as my printer paper, card-stock, and laminate sheets.

I am a huge fan of when norms are thrown to the wind, thinking up what could make life easier, and doing what works for your family. This giant shelf may not be everyone's design dream but it works so well for us!

Share Button

Post to Twitter

DIY Deck Curtains: What You’ll Want to Know {Thoughtful Thursday}

About a year ago I made over our back deck. Our deck is a great size but we weren't utilizing it well.

Thoughtful Thursday

Along with redoing an old bakers rack to use as toy storage and a gross looking outdoor table, I also decided I wanted to make some of the awesome curtains outdoor curtains everyone was pinning. You know the ones: drop cloths, pvc pipe, and clip hooks. I went to town, collected all my supplies, and got to work {with the help of my taller and wiser hubs}. I even took tons of pictures with the intent to share them with you because they were super easy to make! ...except apparently I never did. hehe

Well, in short, I still love the curtains. Or at least the idea of them and how I've recently adapted them to work better for our family.

DIY Outdoor Curtains what you'll want to know, a year later

Now for the longer explanation.

Supplies:

  • 4 khaki drop cloths
  • 4 packs of curtain rings with hooks
  • Rope
  • PVC pipe {I used really small/cheap pipe}
  • Pipe caps
  • Bracket pieces {choose based on size of pipe- it will likely be on the same aisle}
  • Screws
  • Nuts
  • Drill
  • Scotch guard spray*

Installation:

  1. All the tutorials made it seem easy to just cut the pvc pipe, slide on the curtain hooks, hang with something, and clip on the drop cloths. Expect. No.
  2. The cutting itself was easy but the length I needed meant that the skinny/cheap pipes I bought ended up having these widened pieces on them because I had to add another piece to make it long enough. No big deal.
  3. Except the loops on my curtain hooks weren't large enough to make it over that piece. I had to be super strategic about which side I put how many rings. I wanted to be able to pull the curtains closed to block the sun but I also wanted to be able to pull them all the way open to be decorative or let their be more air flow.
  4. Then the hooks were too big to slide easily and would get snagged on the ditch parts of the siding where I was having to hang the pipe around the top of my deck.
  5. Screwing the U brackets in wasn't super easy either. It is hollow behind the siding making it cave in when you press the drill down trying to create the hole for the screw or pressing in the screw.
  6. We used 3 brackets on each side attempting to keep it from sagging.
  7. We did a quick-fix and added a bolt behind the brackets making the rod set further from the wall to help with the snagging problem.
  8. My drop cloths were a little too long between the combination of where I could install the rod and the hanging down clips so I had to finagle them over and over again to fold over some of the curtain to raise them slightly. I would lay them out on the floor, fold them while measuring to make sure they were straight, space the hooks evenly, and then thread the pipe through, trying to remember how many rings when on each side of the pipe bulge.
  9. We did the same thing on the east and west side of the deck and left the south side open- allowed us to see the yard more easily when the kids were playing, the sun didn't really come onto the deck from that direction, and trying to figure out how to do that one was really hard with the stairs to the off-centered right side.
  10. Simple pipe caps will keep bugs from getting in your pipes and/or making nests in them.

DIY Outdoor Curtains what you'll want to know DIY Outdoor Curtains

Observations:

  • Over the first few months we learned a lot about those idealistic curtains that no one told you in their tutorials...
  • They don't stay clean
  • They're hard to take up and down to wash
  • They sag. Adding more brackets was the first answer I came up with but that creates problems again, opening and closing them easily.
  • They fly in the breeze, not blocking the sun
  • They get hooked on the roof/in the gutters in strong wind/rough weather
  • If you tie them back so they don't fly away in rough weather, they mildew {I used scotch guard after taking them down and washing them one time and that helped a little}
  • You can't see your children if you leave them hanging down long past the railing of your deck

After lots of annoyance, I ended up taking them down for nearly 6 months of this last year if not more because I was tiered of asking my husband or risking my own life to fish them off the roof, take them down to wash, re-hang, opening and closing them based on the weather or if I needed to see my kids playing, etc. When spring hit this year I had forgotten most of the frustration and was okay with not having the pinned version of what I was hoping for. I adapted the curtains to fit our needs.

Changes:

I yanked down the entire rod on the east side. We rarely go into the backyard first thing in the morning and even if we do, the sun isn't that bad

I used all the hooks from that side to reinforce my new plan to have just the west side curtains

I only used the bolts from that side as well and doubled the spacing away from the wall to help the curtains pull open and closed easier

I still used 2 panels on the west side but I spun them on their side and made the long length run horizontally. This helped in a few ways--

  • it left the railing exposed so I could see the kids while they played under the curtains
  • the sun was still blocked during the heat of the day
  • they weren't flying as crazy because the length was almost cut in half
  • it makes the curtains look fuller, with lots of scrunch
  • I can just tie them in the middle and their still cute

DIY Outdoor Curtains issues

I hope this helps you see all the pros and cons about the reality of this project and what its like living with them. 😀

Share Button
Related Posts Plugin for WordPress, Blogger...

Post to Twitter