How-to Make Your Own Playdough Mats {Thoughful Thursday}

I found these awesome FREE printables on Pinterest {duh} and my kids LOVE them!

You print them out, LAMINATE them, and then have fun.

I like them because they help my children learn to be more creative with Playdough rather than rolling it into "snacks" over and over again then tasting it.

For my older one, it gave her something for her brain to work on as well as her hands. My second child is a more physical learner so when we start working on numbers this will encourage her to pick it up quicker. I think I may make my own giant letters to laminate so she can work on learning those quicker as well!

If you don't have a laminator I would highly recommend getting one. I have the cheapest i could find and it works Great for all the things I want to use it for. It's a "Scott" brand and I found it at Wal-Mart. The refill laminating sheets are {relatively} cheap as well.

Do you have any fun things you do with your kids and their Playdough that encourage creativity and/or learning?
Do you have a laminator? If so, any tips or recommendations?

Sorry, my link-up is messed up and I haven't had time to fix it yet but I'd LOVE to have links to your thoughfulness! Add a link in the comment section below. Thanks!!!

More Thoughtful Thursday Post!

Share Button

Post to Twitter

Homemade Yogurt Melts {Thoughtful Thursday}

Have you ever tried Graduates' yogurt melts? Well, I haven't. But my kids have ;o)

I like that these are a healthy snack they can feed themselves as soon as they start eating finger foods. I also like that they're not really messy!

A little while back I saw the next picture on Pinterest {imagine that} as well as it's recipe for making yogurt dipped blueberries that you freeze. Cool! I don't like blueberries or yogurt. But my kids do! Jamin is still working on teeth so I'm not confident in giving him the blueberries so I decided to make my own, homemade, yogurt melts!

I took my handheld blender and blended up the strawberry yogurt so it would be completely smooth with no big chunks.

Then I simply dripped little dots {some not so little} onto wax/parchment paper on a cookie sheet and put it into the deep freeze for a few hours.

Score! He LOVES them! So do my older girls. They are definitely messier than the Graduates version but cheaper.

~~~~ Just found this blog on Pinterest: Love the medicine dropper tool to get more accurate drops! ~~~~~

What kind of homemade tricks to you have up your sleeves?
Will you be thoughtful and share the link in the comments below? Thanks!!!

Share Button

Post to Twitter

“Oh, you can make milkshakes out of icecream?” {Thoughtful Thursday Link-Up}

That's right. I'm slack'n and didn't get the Thoughtful Thursday link up ready to go before 9pm. But here it is!

After dinner one night my girls were so excited to tell their daddy they were getting "SHACKS" for dessert! My husband came to me wondering where I was going to pick up shacks for them and when I told him I was making them he said, "Oh, you can make milkshakes out of icecream?"

Uummm, yeah! Duh. hehehe

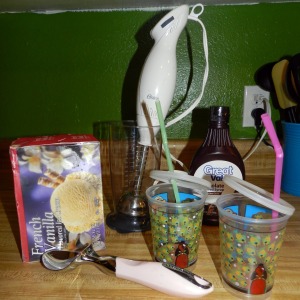
Desired amount of icecream, any added flavoring you want, blend, pour, slurp!
I also like to put plain yogurt and frozen fruit in a blender and calling it a "shake"! My girls LOVE it and think it's the best snack/dessert Ever ;o)


I'm sure you have some way more Thoughtful things to share. Link'm Up below! {open 'til next Wednesday}

Share Button

Post to Twitter

Micro Cooker {Thoughtful Thursday Link-Up}

Another must is my Pampered Chef Large Micro Cooker for Microwave. I think you're supposed to use it for rice, veggies, etc but we brown our ground beef in it. Score! Brown 1 lb beef with no grease burns in a quick ~5min! (then chop it with the mix-n-chop, wink wink)

I have since bought one of each of these pampered chef tools off eBay for my mom. Love'em
I should sell these babies ;o)

Revive Frost-bit Chicken
Brown Ground Beef {for stew} & break apart using pampered chef chop-n-mix

*Note: I am not being paid for these recommendations/reviews but if you know how I can- bring it!

Do you have any gadgets that have made your life in the kitchen easier? Please share a link in the comment section below! {sorry, link-up messed up}


Share Button

Post to Twitter

Refried Beans {Thoughtful Thursday Link-Up}

Do you have anything thoughtful you 'd like to share this Thursday? Some little helpful hint? A fun recipe? A tool you love? Please share by linking up below and then posting the "Thoughtful Thursday" button to your post so other ladies can get lots of thoughtful helps! Consider visiting the link above yours and encouraging them through comments!

Here's my thoughtfulness for the week:

Any other WIC mamma's out there? Do you have those huge piles of beans in your pantry or cabinet building higher and higher every month? How 'bout cheese? Need something new to use up those cans of beans and blocks of cheeses? Here's my new WIC refried beans recipe:

Homemade Refried Beans

  • 2 cans of pinto beans
  • 2 tbl onion pwd
  • 1 tbl onion salt
  • dash of regular salt
  • 1/4 cup shredded mozzarella cheese
  • 1/4 cup shredded mozzarella cheese {for top}


In a medium sized sauce pan dump your 2 cans of beans {mainly drained} along with all of your seasonings and 1/4 cup cheese.

Begin to heat them stirring occasionally so it doesn't burn on the bottom of the pan. Lower the temp when it begins to boil as to let it just simmer.

Mash beans with a potato masher. I don't like big pieces of bean skin so I used a blender to puree' them even more {optional}.

After they're well mixed then I poured them into a serving dish and shredded the other 1/4 cup cheese over the top. I made mine a head of time to you can reheat the beans closer to time either in the microwave or in the oven.

This entire recipe only takes about 5 minutes. Hope you like!

Do you have any recipes to help use up some of those monthly WIC items?


Share Button
Related Posts Plugin for WordPress, Blogger...

Post to Twitter