DIY Cake Stands {Thoughtful Thursday}

I love baking! But surprisingly I don't own a cake stand, of any kind. Hmm, how did that happen. Anyways. I'd seen tons of cute DIY cake stands on Pinterest and when this shower came up I thought it would be the perfect time to try out a custom made colorful cake stand and several other Pinterest inspired projects!

As always I looked at pictures online but I'm terrible at following directions so I winged it and did a little tweaking to work with what I had or could get easily. Here's what I came up with.

Supplies {enough for 1 cake stand- I ended up making 4}:

  • 1 dollar tree pizza pan {preferably not warped}
  • 1 dollar tree {short} glass candle stick holder
  • 1 can of each desired color
  • Glue {E6000- great for glass!}

Directions:

  • Head to the local Dollar Tree {ya know, where everything is Uno Dollar!} and snatch up your suppies then shoot on over to where ever you buy your spray paint {I did Krylon from Wal-Mart because they had the colors I needed but pic your fav}
  • Peel off the wrapping from the pizza pan and pick a place to spray away. I prefer to do a light coat on the bottom of my project 1st so then I can concentrate on the most visible part. In this case, the TOP of the pan will be the bottom of the cake stand.

  • Next spray paint your candle stick holder. I did spray inside of the holder and then the bottom but the focus will be the outside since it will be glued on the pan and sitting on the bottom but I wanted maker sure the white wouldn't be transparent.

  • Place your pan on a flat surface, find the center of your pizza pan and glue your candle stick there. This is important so it balances your cake and won't tip over. I chose to put the smaller end of the holder on the pan. Then I balanced heavy books on top of the 'bottom' of the holder to assure the glue adhered well.

  • Vuala, Cake Stand!

If you liked this DIY Cake Stand Tutorial, pin it!


Share Button

Post to Twitter

Delievery Goodies

The other day I told you I'd just ordered 151 FREE prints from Shutterfly.
Well, guess what showed up in the mail today!?!
{FYI: there are still more deals going on@ Shutterfly!}

 I spent a couple hours up dating ALL of our picture frames in the house. If you've never been to my home, you should know that Every room has picture frames in it! I LOVE pictures. I haven't printed pictures in quite a while though. Surprisingly , I still didn't have enough frames. Many of the pictures left unframed where of my children playing so I've decided I'm going to make some collages and laminate them. I think my girls will enjoy making frames for them to hang in their playroom.
Here's a quick tour of some of the new pics I added/switched out/updated around our home:

Shutterfly.com

Share Button

Post to Twitter

DIY Address Plaque {Thoughtful Thursday}

Today is thoughtful Thursday so feel free to share ANY helpful hint! Have a fun recipe? A tool you love? Please share by linking up below {linky messed up so add them in the comment section} and then posting the “Thoughtful Thursday” button to your post so other ladies can get lots of thoughtful helps! I know I've been sharing a lot of recipes lately but ANYthing thoughtful is welcome! Consider visiting the link above yours and encouraging them through comments!

I wanna show you how I made my new address plaque for my house {2 years of living here with no number on the house was prolly long enough}! When we started fixing up our house to sell it I remembered I still didn't put up our house number anywhere on our house. Good thing we don't order a lot of pizza to be delivered. This is my front door...

See, very symmetrical. I wasn't quite sure where to put the number. I decided I'd but it above the door, spelled out since our house number is 5. Yep, just 5. "Number 5". Confuses a lot of people. Sounds like an apartment. We tell friends our address and they wait patiently for the letter to follow the 5. Ya know, 5B, 5D. I digress.
DIY Plaque:

I found this solid wood plaque at Wally World for ~$6.oo

I broke out my acrylic paint. I chose black and white.After I finished the painting, I PRINTED the word five off a word document in some fancy cursive font. Make sure to let the ink dry thoroughly.
I cut the word out leaving as little of the white as possible.
Then I used Modge Podged it glue down the paper. Mine ended up being a lil off centered...measure:!
After I glued the bottom and top of the word down {gently so you don't tear the moist paper or smear the ink} I sprayed the entire plaque with a spray clear paint for a sealant since it will be out in the weather.
Lastly, I had my hubs climb on a ladder, center the plaque and use 2 large screws to hold the plaque in place.

 What are some creative ways you display your house number?

Share Button

Post to Twitter

Goodwill find!

I love the goodwill!

This past month I had the weird opportunity to go overnight to stay with my parents and see a friend all by myself. It was super weird and if your a mom you know what I'm talking about. Relaxing, healthy, but...weird!

Anyways. While I was there my mom and I got to fart around a little, run some errands, and check out the new, GIANT Goodwill in my hometown. I found these:

SCORE!!!

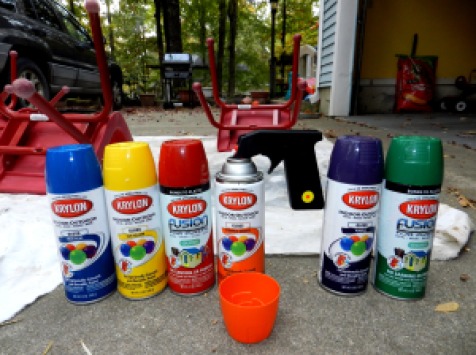
I'm been looking, pricing, and watching for 'preschool' chairs to go with my kids table we got serveral months ago. If you don't know anything about these they normally run anywhere from $15.00 for used and as high as $30.00 brand new. I found these for $20.00 - for the SET OF 4!!! That's $5.00 a chair! They in perfectly usable shape just a little ... loved on. I decided I'd try and paint them. I'd been looking for multiple colors so they would go with our 'theme' in the playroom. The hope of having a couple chairs that were primary colored (blue, yellow, red) and a couple that where secondary colored (orange, green, purple) made the hunt even harder/more expensive.

I found this Krylon paint at Wal-Mart for ~$4.00 each. I only found 2 that were "Fusion for Plastic" so I got those and then thought I'd try the normal stuff since I hadn't found all the colors I wanted  in the plastic type. And I already owned the black attachment on top of the orange can. I highly recommend this tool if you plan to do lots of spray painting projects! I helps keep your hands (fingers) clean, keeps an even spray, and your fingers don't hurt afterward from pressing down so hard.

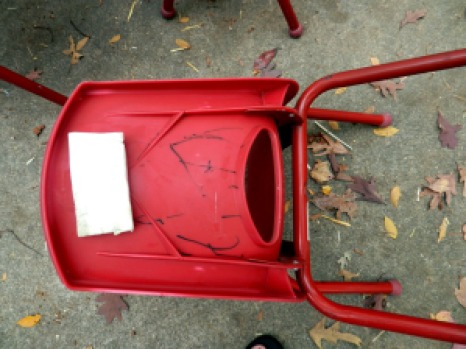
I laid out a very used drop clothe on my driveway while my kiddos played in the yard. I cleaned them all up with multipurpose cleaner, warm wet rag, and a magic eraser (LIFE SAVOR- everyone who has kids should have some- cheap brand works just as good) if necessary.

After srubbing them all down and make sure they were completely dry I fliped them all upside down and spread them out so the different colors wouldn't blow on the chair next them. I started on the bottom so I'd feel free to use the rest of the can on the seat and back parts that would actually show!

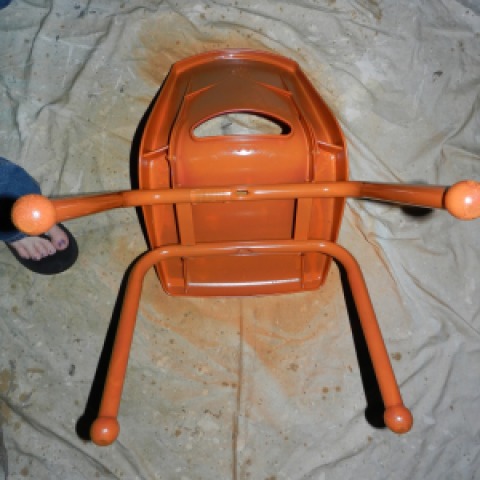
I started with the orange and was super disappointed in how it looked...spray painted.

I did as well as I could and then moved onto the green "Fusion for Plastic" to see if it looked any better before I completely gave up. YEP! There's a reason they made special paint for plastic. The green looked GREAT! Only wasted 1/2 can... I took the other non-plastic specific paint back and searched at other Wal-Marts near us for the other colors. I found 5 of the 6 colors I wanted in the 3 different stores. Well worth it and I didn't make extra trips, I only went to ones I was already near for other errands I was running.

SuPeR pumped about my 4 preschool chairs I got for ~$9.00 each!!!

~~~

Where is your favorite place to find good deals? Any new fun projects going on in your world?

Share Button

Post to Twitter

MY Poppy Seed Project {tutorial}

Today I'll be posting the step-by-step progress {literally} of
MY Poppy Seed Project.

Last night I received my long awaited package
in the mail.

1. Order and Anticipate. They took about 7 business days to receive the package after it was shipped. They we very Well packed.


This morning I started painting!

2.  Paint frames: I am doing a pattern on the bigger frame that will be layered behind the smaller so it will end up being painted twice. The first coat of paint will be the color of the pattern. The top coat will be the color of the frame. I painted both frames with the Krylon Brushed Metallic Satin "Caramel Latte". I started with the back side {could have just done 1 coat since it won't really be seen but went ahead and did 2 to test how it would look}. Then I put pushpins in the inner part where the backing goes as to not make holes in the back. These allowed me to speed the process up and start painting the front by flip them over without smudging the paint on the back.

This afternoon I created polka dots!

3. Trace where the layered frame will be. I waited until the paint had dried and then centered the smaller frame on top of the larger frame. Then I traced around the smaller one with a pencil and I flipped it over and traced the square on the inside of the smaller one so I'd be able to see how to line it up after painting over the polka dots.

4. Design polka dots pattern. I raced circle using a small medicine bottle onto painters tape and then cut them out. {They are NOT exact} Then I place them semi-randomly around the larger frame.

Some of the polka dots hung over so I trimmed the extra off.

5. Double check design. Then I put the small frame back on top to make sure I liked their placement before I painted over them. I did end up moving some of the dots {GREAT thing about painter's tape}.

When the polka dots where ready I painted the top layer on the large frame!

6. Paint the top coat and remove vinyl. I painted ~3 coats of red to make sure it covered well. I didn't take many pictures of taking the vinyl off because I was fighting off babies but it's really simple. Some of my red smugged a little while I was peeling it off but that just adds to the DIY look ;o)

I then glued the frames together!

7. Glue the frames together. I using Liquid Nails to glue the small frame on top of the big frame. I'm letting the frames sit for several hours with lots of weight on top to help adhere the 2 frames. {I put parchment paper between the books and the frames to make sure the didn't stick/pull off paint when I removed them}

 When the glue was securely dried I places it on my mantel in the living room!

8. Add the frames to home decor. I place my frame on the mantel along with a few other items I already had around the house. LOVE THESE FRAMES! Can't wait until my next project with them!

Keep in mind that this is just 1 example of what YOU can get with the Poppy Seed Project gift card.
Visit their site HERE and Enter the giveaway HERE!

Share Button
Related Posts Plugin for WordPress, Blogger...

Post to Twitter